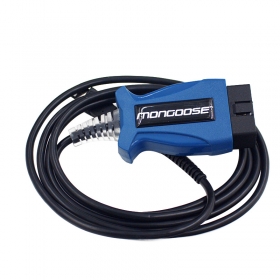
JLR Pro for Jaguar and Land Rover
Model name:JLR pro
Software Version:V145
Update:By link
Car Models:for Jaguar and Land Rover
Languages:Multi-languages
Functions:Diagnostic interface
Connection:By OBD2.
Computer requirements:Better is XP
JLR Mangoose SDD V143 is verified working well and available at WWW.AUTOCARDIAG.COM
SDD V143 compatible hardware:
JLR Mangoose (SP116)
JLR Mangoose Pro (SP205)
VXDIAG VCX NANO for Land Rover and Jaguar (SP240)
DA-VINA 2534 J2534 Pass-Thru Interface (SP202)
VCM 2 (SP177-G, SP177-FB, SP177-E)

SDD V143 software free download:
SDD V143 comes with 3 DVD’s, the CD’s is 99% Executables (.EXE) and a Frozen software to get license key.
If you get the CD broken, don’t worry, just browse
http://diagnosticdelivery.jlrext.com/idscentral
Download only these files:
SDD 143.00_FULL.exe
VDF_JA_143.exe
VDF_JV_143.exe
VDF_LA_143.exe
VDF_LV_143.exe
SDD_143.01.exe
SDD_143.02.exe
SPA_143.exe
(Note: With these files you can’t install yet, you need additional “Driver for MangoosePro_JLR” and license key.)
JLR Mangoose Pro SDD V143 Setup Instruction:
OS requirement:
Xp system or XP Mode in Windows 7 (Step-by-step instruction:
http://windows.microsoft.com/en-us/windows7/install-and-use-windows-xp-mode-in-windows-7 ), or vmware XP in windows 7
Installation Tips:
Tip 1: Disable both local area connection and wireless connection network, otherwise antivirus software will say virus possibility on the license key software.
Tip 2: Firstly install software then driver then freeze software, finally to test diagnostic function.
About freeze software and how to do if the software expire?
- JLR SDD V143 is offline trial version, the software will expire within one day. The freeze software has to be installed within one day to freezethe software and can be used all the time.
If you didn’t install the freeze software within one day, you will get prompt saying the software has expired, the solution is to reboot the computer, enter the computer BIOS settings, reset the computer date/time to the day before the trial period.
Take Dell D630 laptop for example, press “Power” button then F2 button, then enter BIOS – Date/Time, reset the date/time to 2015-12-7 7:36:12 PM.
Overview:
Part 1 Install SDD
Part 2 Install VDF_JA
Part 3 Install VDF_JV
Part 4 Install Additional Pinpoint Tests
Part 5 Install SDD 143.01.001
Part 6 Install VDF_LA
Part 7 Install VDF_LV
Part 8 Install J2534 MongoosePro JLR Setup
Part 9 Install software for MongoosePro JLR J2534 Interface
Part 10 Run JLR SDD
Part I1 Install Deep Freeze
Step –by – step procedure
Part 1 Install SDD
Open My Computer>>143-1(F:), to copy “Driver” “DF5td” “DFStd_KEY” to Desktop.
Open “SDD143.00_FULL”.
Select setup language to continue.
Click Yes to restart your computer.
Click Next.
Installing…
Click Next for installing SDD.
Select “I accept… agreement” and click Next.
Tick on “I have read and understand…” and click Next.
Destination: click Next.
Languages: click Next.
Click Install to begin installation.
Installing SDD…
Click Next to install M0XA UPort 1110/1130/1150 Windows Driver.
Destination location: click Next.
Start menu folder: click Next.
Click Install to begin installation.
Installing M0XA UPort 1110/1130/1150 Windows Driver.
Click Finish for installation of M0XA UPort 1110/1130/1150 Windows Driver.
Go on installing SDD…
Click Finish when successfully installing SDD and restart your computer.
Part 2 Install VDF_JA
Open My Computer>>143-1(F:)>>VDF_JA_143.
Choose setup language.
Installing…
Click Finish after successfully installing VDF_JA.
Part 3 Install VDF_JV
Close all the interface, and reopen My Computer>>143-2(F:)>>VDF_JV_143.
Choose setup language.
Installing…
Click Finish after successfully installing VDF_JV.
Part 4 Install Additional Pinpoint Tests
Open My Computer>>143-2(F:)>>SPA_143.
Prompt: Additional Pinpoint Tests will be installed as a background task. Click OK.
Installing Additional Pinpoint Tests…. (wait for about 1 hour)
Click Finish after installing Additional Pinpoint Tests.
Part 5 Install SDD 143.01.001
Close all the interface, and reopen My Computer>>143-3(F:)>>SDD 143.01.
Click Yes to restart your computer.
Installing SDD 143.01…
Click Finish after installing SDD 143.01.001, and restart your computer.
Part 6 Install VDF_LA
Close all the interface, and reopen My Computer>>143-3(F:)>>VDF_LA_143.
Choose setup language.
Installing…
Click Finish after installing VDF_LA.
Part 7 Install VDF_LV
Open My Computer>>143-3(F:)>>VDF_LV_143.
Choose setup language.
Installing…
Click Finish after installing VDF_LV.
Part 8 Install J2534 MongoosePro JLR Setup
Close all the interface, and open “Driver” on Desktop.
Right click drivers for MongoosePro JLR for Install.
Click Next.
Click “I accept…agreement” to go on.
Destination folder: click Next.
Click Install.
Installing J2534 MongoosePro JLR Setup…
Prompt: please attach your device to this computer any time after installation has finished. Click OK.
Click Finish.
Restart your computer.
Part 9 Install software for MongoosePro JLR J2534 Interface
Found New Hardware Wizard: click Next, with selection of “Install…(Recommend)”.
Installing…
Click Finish for installing software for MongoosePro JLR J2534 Interface.
Right click My Computer for Manage.
Select Device Manager>>Vehicle PassThur Interfaces>>MongoosePro JLR J2534 Interface.
Then close computer management.
Part 10 Run JLR SDD
Open JLR SDD on Desktop.
Close Setup Windows Internet Explorer 8 interface.
Close Windows Internet Explorer interface.
Loading…
Window Explorer- Search Provider Default: click OK.
Close Manage Add-ons interface.
Click the play button to enter SDD.
Click Continue.
Click Continue.
Finish dealer information to use SDD. Click Continue.
Click Continue. (here’s a J2534 icon)
Click Auto VIN Read.
Click Start new session.
Select High line instrument cluster, and click save.
Click Diagnosis.
Select Powertrain>>Engine system>>Engine cooling, and click Continue.
Select CAN_HS>>PCI>>Rerun data collect for this module.
Again click Diagnosis.
Click continue.
Click Recommendations and Service Functions on the top line, to read.
Close the interface after reading.
JLR Application Launcher: select Stop Application.
Part I1 Install Deep Freeze
Open “DFStd” on Desktop.
Click Next.
Click “I accept…agreement” to go on.
Open “DFStd_KEY” on Desktop, to copy the license key for entering. Click Next.
Click Next, with the only selection of C: (cancel ticks on D: & E:)
Click Install.
Then restart your computer after installation Deep Freeze.
Done!
==================================
24hour Online Customer Service:
E-mail:autocardiag@gmail.com
Skype:Marshall.obd2
Whatsapp:86-13476108995
http://www.autocardiag.com
==================================
No Comments